
Search the Community
Showing results for tags 'skyrim se'.
Found 11 results
-
Version 1.0.0
80 downloads
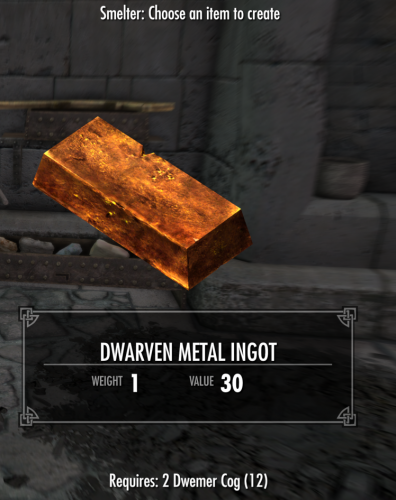
This simple little mod allows the player to smelt the various Dwemer scrap (cogs, gears, gyros, levers and small levers) into ingots at the rate of 2 for one. This mod was successfully tested on the Anniversary Edition version 1.6.1130. This mod has been verified clean with Xedit 4.0.4. If you wish to communicate with me about this mod, you may do so here, or you can find me on Discord at https://discord.gg/ewqkeBwF This mod has been uploaded to Bethesda net for Xbox (https://mods.bethesda.net/en/skyrim/mod-detail/4331903). This mod may be downloaded for use during gameplay only. Any other use is prohibited. This mod may NOT be shared, reuploaded or modified without my EXPRESS WRITTEN permission. This mod is not made, guaranteed, or supported by Microsoft, Zenimax, Bethesda Game Studios, or any of their affiliates. -
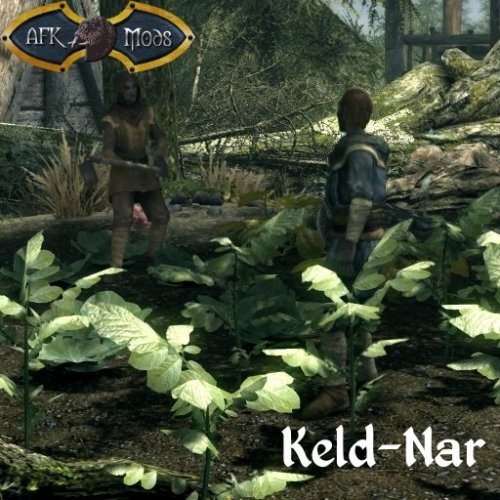
This doesn't translate to Feldscar at all. It translates to Keld-Nar, a long abandoned village deep inside Skyrim to the north. Keld-Nar lies in between an ancient Nordic tomb, and a large black rock who's origins Keldon and I were never able to determine. - Raminus Polus, circa 3E 433. An age ago, during the Oblivion Crisis, a Nord village found itself on the brink of disaster at the hands of a pair of Dunmer mages. They were on a quest, no, a mission to find what they thought would lead them to salvation against the onslaught of the Daedra. Instead, they found Feldscar and eventually their plans were torn asunder by the Champion of Cyrodiil. But what of the village that Raminus Polus told the Champion about? Keld-Nar, the site of the actual prize the Dunmer sought? Raminus Polus and Keldon Swiftrunner had been there before, but what became of it since then? 30 years ago, refugees of the Great War set forth out of northern Cyrodiil in a desperate gamble that would answer this question once and for all. Where once ruins lay, a thriving village has sprung up in their place. Come in traveler, stay awhile, rest your weary legs and listen to an old man's tale. Keld-Nar is a village in Eastmarch, near the Dwemer ruin of Mzulft. It boasts an inn, a blacksmith, stables to park your horse at, and a decent sized local garrison of troops. Unlike many other populated areas, Keld-Nar welcomes Khajiit, owing to the history the ancestors of the current residents had with them in Feldscar those many decades ago. The village starts off held by Stormcloak Rebels and openly worships Talos, but will change hands to Imperial control if they win the Civil War. Where possible, Keld-Nar should also be included in any town based radiant quests and will be subject to dragon attacks. It may also be subject to random vampire strikes if you have Dawnguard. Download Locations AFK Mods ModDB Bethesda.net - PC + XB1 Installation Requirements Skyrim Special Edition 1.6.1130 or greater. Unofficial Skyrim Special Edition Patch 4.3.2 or greater. DO NOT extract the contents of the BSA file into your Data folder as loose files, or let your mod manager perform an equivalent function on the contents of the file. Doing so will cause things to load in the wrong order and break the game. Skyrim is intended to load a BSA alongside it's ESM/ESP file. Circumventing this causes issues which I will not provide support for. If you insist on going against this advice, you will receive no support for the problems you generate as a result of this. Installation - Wrye Bash BAIN Drop the archive into your Skyrim Special Edition Mods\Bash Installers folder, then install as usual. Make sure the mod is active in the Wrye Bash mods tab. Installation - Manual Drop the Keld-Nar.esp, Keld-Nar.bsa, and Keld-Nar - Textures.bsa files into your Data folder. Activate the mod using whatever management tool suits you. Uninstalling Due to the nature of Skyrim mods, especially those adding scripts, it is strongly discouraged to attempt uninstalling a mod from your active game. Any mod that is more than pure mesh or texture replacements has the possibility to leave behind permanent changes to your save that you may not want. This is not something modders can correct for. It is how the game was designed by Bethesda. No support will be provided for anyone who uninstalls this mod from an active game and continues on with that save. To remove the mod: Delete the Keld-Nar.esp, Keld-Nar.bsa, and Keld-Nar - Textures.bsa files from your Data folder. Then reload your game as usual. Load Order LOOT should be used for optimal placement. Compatibility Arons Mecha Dragons places two mechanical dragons at Mzulft which are too close to the village and end up attacking it. Papyrus has been used to disable these two dragons without requiring a patch. Credits Hanaisse - Sign for The Horny Horker, road sign and shop sign assets, the Keld-Nar book, children's clothing textures, and the unique Dwemer child assets for Nedri. DanielCoffey - Better Book Mesh (https://www.nexusmods.com/skyrim/mods/37113) Used for the Keld-Nar book. Disclaimer This mod is not made, guaranteed, or supported by Microsoft, Zenimax, Bethesda Game Studios, or any of their affiliates.
-
A hunting and fishing village on an island in the Sea of Ghosts. Nords have always been spoken of as hearty and tolerant of the cold, but Skyrim has few instances where this is demonstrated. Plus there is a lot of implication that many spend a lot of time at sea hunting horkers and fishing but no reflection of this exists anywhere except one hut in the Skaal Village. This mod aims to change that a bit by offering an entire settlement dedicated to the task of hunting horkers, fishing, and raising goats and cattle for meat. There's plenty of meat and fish available for the taking on the island and now someone is there doing just that! I also wanted to do something with the Skaal Village tileset and figured this would be a good opportunity to make use of it and some of their clothing. No, these Nords are not an offshoot of the Skaal, but they do share architecture and some clothing in common. Old school (and I mean old) may recognize the name of the mod as an old Commodore 64 game by Avalon Hill (circa 1983). This mod serves as a bit of an homage to the game that first got me hooked on RPGs and on the idea of modding them as well. The village's name isn't the only Easter Egg you'll find either Features include: * Custom inn layout using Skaal Village architecture. * NPCs with complete schedules. * Military control changes based on who controls Winterhold. * All houses are radiant quest enabled, so you may get Companions missions and anything else that's properly configured to use NPC homes for quests. * LOD has been generated for the area. Want to get a taste of some real retro gaming? A PC remake of Telengard can be found here: http://buildingworlds.com/telengard/ Yes, I have played it, and it's a very faithful reproduction of the original experience. Download Locations AFK Mods ModDB Bethesda.net - PC + XB1 Installation Requirements Skyrim Special Edition 1.6.1130 or greater. Unofficial Skyrim Special Edition Patch 4.3.2 or greater. DO NOT extract the contents of the BSA file into your Data folder as loose files, or let your mod manager perform an equivalent function on the contents of the file. Doing so will cause things to load in the wrong order and break the game. Skyrim is intended to load a BSA alongside it's ESM/ESP file. Circumventing this causes issues which I will not provide support for. If you insist on going against this advice, you will receive no support for the problems you generate as a result of this. Installation - Wrye Bash BAIN Drop the archive into your Skyrim Special Edition Mods\Bash Installers folder, then install as usual. Make sure the mod is active in the Wrye Bash mods tab. Installation - Manual Drop the Telengard.esp, Telengard.bsa, and Telengard - Textures.bsa files into your Data folder. Activate the mod using whatever management tool suits you. Uninstalling Due to the nature of Skyrim mods, especially those adding scripts, it is strongly discouraged to attempt uninstalling a mod from your active game. Any mod that is more than pure mesh or texture replacements has the possibility to leave behind permanent changes to your save that you may not want. This is not something modders can correct for. It is how the game was designed by Bethesda. No support will be provided for anyone who uninstalls this mod from an active game and continues on with that save. To remove the mod: Delete the Telengard.esp, Telengard.bsa, and Telengard - Textures.bsa from your Data folder. Then reload your game as usual. Load Order LOOT should be used for optimal placement. Compatibility No known issues, unless something mods the area around "The Chill" (Winterhold's prison). Disclaimer This mod is not made, guaranteed, or supported by Microsoft, Zenimax, Bethesda Game Studios, or any of their affiliates.
-
Version 2.0.12
13409 downloads
This doesn't translate to Feldscar at all. It translates to Keld-Nar, a long abandoned village deep inside Skyrim to the north. Keld-Nar lies in between an ancient Nordic tomb, and a large black rock who's origins Keldon and I were never able to determine. - Raminus Polus, circa 3E 433. An age ago, during the Oblivion Crisis, a Nord village found itself on the brink of disaster at the hands of a pair of Dunmer mages. They were on a quest, no, a mission to find what they thought would lead them to salvation against the onslaught of the Daedra. Instead, they found Feldscar and eventually their plans were torn asunder by the Champion of Cyrodiil. But what of the village that Raminus Polus told the Champion about? Keld-Nar, the site of the actual prize the Dunmer sought? Raminus Polus and Keldon Swiftrunner had been there before, but what became of it since then? 30 years ago, refugees of the Great War set forth out of northern Cyrodiil in a desperate gamble that would answer this question once and for all. Where once ruins lay, a thriving village has sprung up in their place. Come in traveler, stay awhile, rest your weary legs and listen to an old man's tale. Keld-Nar is a village in Eastmarch, near the Dwemer ruin of Mzulft. It boasts an inn, a blacksmith, stables to park your horse at, and a decent sized local garrison of troops. Unlike many other populated areas, Keld-Nar welcomes Khajiit, owing to the history the ancestors of the current residents had with them in Feldscar those many decades ago. The village starts off held by Stormcloak Rebels and openly worships Talos, but will change hands to Imperial control if they win the Civil War. Where possible, Keld-Nar should also be included in any town based radiant quests and will be subject to dragon attacks. It may also be subject to random vampire strikes if you have Dawnguard. My Patreon Page: https://www.patreon.com/arthmoor Requires the Unofficial Skyrim Special Edition Patch to be installed first! -
Cleaning the Official Master ESMs NOTE : I do not have any Bethesda games installed anymore, and xEdit has changed greatly since I last had it installed. Anyone wishes to re-do this topic in a new thread bringing it up to date .. Crack on This guide assumes using TES5Edit on Skyrim Nexus, Or SSEEdit on Skyrim SE Nexus Due to this guide being dual purpose ( For Skyrim and Skyrim SE ) for the rest of this guide I will refer to both tools as xEdit. Screenshots of tools used may be one or the other, or older versions, which does not matter, the images are only to illustrate the method / options used. Why Clean the Master Files ? Firstly because the masters have entries that are identical to the same records in Skyrim.esm or other DLC esms'. They exist because Bethesda may have looked at something in the CK and an unneeded entry was auto included in the plugin even though the item was not altered in any way. The Official Creation Kits are notoriously buggy and randomly create dirty / wild edits, often when the author of the plugin is completely unaware. Wherever that plugin is placed in your load order its records overwrite all the conflicting records from plugins loaded before it ( the rule of one ) resetting the settings back to the values contained in the Official Bethesda DLC. It won't cause crashes, it just changes the values of plugins loaded before it. Which can alter mods that you have for Weapon Damage, Armor, Lighting, Food Effects and so on. The masters are very early in your load order but there is potential for a mod to be made as a fake.esm, and placed among them, and so ITMs in a later loading master may cause problems for that mods esm. Chance is remote that a master will affect another master, and this procedure is best used on all of your mods plugins, but cleaning everything of ITMs ( Identical to Master records ) causes no harm, is more optimal giving the game less to process in your load order, and so it is best to get rid of these completely unnecessary dirty edits. The Second reason is that Bethesda chose to delete some things that are in the Official DLC. Any mods loaded with references to deleted records from the Official Bethesda DLC will cause your game to crash. This problem particularly affects older mods ( especially mods that were made before newer official patches were released, with more deleted references the old mod did not anticipate - It will also become problematic for the Skyrim Special Edition community where old Original Skyrim mods are being converted to SSE, and Bethesda have deleted even more records from the plugins before they released the newer plugins for that version of the game ). xEdit can restore and properly assign values to these records that will disable them and still allow mods to access them. This is done using the "Undelete and Disable References" option. For further explanations of why it is still recommended to clean the games masters .. Read on from this post, Zilav and Arthmoor, most valued technical and vastly experienced modding authors, weigh in on the subject. The following mostly apply to mod authors, but worth knowing about for mod users too : xEdit will also report when a mod has Deleted NavMeshes as part of the report from Automatic cleaning. Like deleted references, any mod that references a deleted NavMesh will cause Skyrim to Crash. Properly optimizing your mods NavMeshes and checking your mod for Deleted Vanilla NavMeshes ( which can also be caused by a CK wild edit even if you did not do it yourself ) is important. Mods altering the same cell and the same NavMeshes when your mod is not optimized will cause Skyrim to Crash. Poorly optimized NavMeshes with errors reported by the CK will make Skyrim unstable. Instabilities like fast travelling to a location and Skyrim crashes. Note the ones found to be deleted in the games masters, cannot be undeleted. To fix deleted Navmeshes in your mods, Arthmoor has provided a walkthrough in Skyrim - Fixing Navmesh Deletion in TES5Edit Manually cleaning your mods is also important to remove wild edits. This is mostly down to the experience of Mod Authors to solve such problems, but there are a few noted later in this guide which are in the DLCs which everyone can easily Manually clean. Some mods can have accidental Wild Edits in them caused by the author looking at how Bethesda did something they wish their mod to do as well. These Wild Edits often prevent Skyrim from doing things like advancing quests, spawning NPCs, assigning dialogue to NPCs, preventing NPCs from patrol areas they are assigned to. They can also alter Vanilla Lighting and Triggers that the author wished to use. All of these things affect any plugin with conflicting records loaded before a mod with Wild Edits. Mod authors - Learn to use xEdit, and ensure the only records in your mod plugins are what you would expect to be in there, its the most important tool the community can make use of when used properly. Mod Users - Follow this guide... Before moving on to the Manual cleaning, something everyone should do prior to Manual Cleaning : Automatic cleaning of Bethesda's ESMs with xEdit With the games Original esm's installed ( You can use Steam to Verify Integrity of Game Cache of Skyrims files to ensure you have good error free copies of the original master files ), and in accordance with the following wiki article http://www.creationk...ty_Plugins_List : Load up xEdit. 1. Right click the plugin selection screen and select "none" 2. Tick the relevant esm to edit, and click okay ( If you have not cleaned any of your Master files yet, the first one to tick will be Skyrims "Update.esm" ), then click Okay After each of the following actions, wait for a message in the message window that the previous operation has finished / Done : 3. Right click the plugin after you get the "Background Loader : Finished" message,and choose "Apply Filter for Cleaning" Wait until Filtering is finished then .. 4. Right click the plugin and choose Remove Identical to Master Records Wait until it finishes then .. 5. Right click the plugin and choose Undelete and Disable references Wait until it finishes then .. 6. Close xEdit, and it should check with you that you wish to save the plugin ( this only happens if you have made any changes to the plugin to save, if it just closes .. Then you have not cleaned anything ) Rinse and repeat the Automatic cleaning ( steps 1 - 6 above ) for each of the master files. Working from first to load, to last, not including Skyrim.esm or any unofficial patches ( No point doing Skyrim.esm, and the unofficial patches are already done and should not be cleaned ) So clean in this order Update.esm Dawnguard.esm Dawnguard.esm ( Yes it needs to be done twice ) Hearthfire.esm Dragonborn.esm Dawnguard.esm needs to be cleaned twice ( as of xEdit 3.1 onwards - After doing the automatic cleaning routine once on Dawnguard.esm, and saving it, load it up again in xEdit and you will be able to clean a few more ITMs ) : ------------------ Dawnguard.esm needs manual cleaning aswell as automatic cleaning After the automated cleaning is done, you can also now manually clean a few more Wild edits xEdit will not have touched ... Recently Arthmoor has brought to the attention of the community additional information regarding manual cleaning of Dawnguard.esm, which everyone needs to do for their own setup same as automatic cleaning ( because nobody can legally upload official master files anywhere, everyone needs to do their own ) First load up xEdit When the plugin selection comes up, right click and select None Then put a tick in the box just for Dawnguard.esm, click Okay After its finished loading, right click Dawnguard.esm and choose "Filter for Cleaning" 1. For "CELL 00016BCF: Remove XEZN subrecord referring to RiftenRatwayZone [ECZN:0009FBB9]. Otherwise it blocks the official fix in Update.esm." .... Expand the records as in the following screenshot, and right click the indicated sub-record, and choose Remove 2. For "CELL 0001FA4C: Wild edit. Remove this record. It's a testing cell." .... Expand the records as in the following screenshot, and right click the indicated record, and choose Remove 3. For "CELL 0006C3B6: Wild edit. Remove this record. It's a testing cell." .... Expand the records as in the following screenshot, and right click the indicated record, and choose Remove NOTE : This guide used to include cleaning instructions for "CELL 00039F67: Wild edit. Remove this record. It's a testing cell" ( The WICourier edit ) - But since the new version of TES5Edit 3.1+ now cleans that as part of the automated cleaning ( which you should have done prior to manual cleaning ), you no longer need to clean it manually afterwards. ----------------------------------------- Now that the Master files are cleaned, you could put them in a zip, and get your mod manager to install them - Maybe at a future date you want to do a refresh of steam cache and it redownloads the masters which are not the same as the originals anymore (because you cleaned them), so then you would need to reclean them again. But beware, Bethesda have started redoing some masters due to Creation Club mods compatability, so make sure any redownloaded masters are not newer than your previously cleaned ones, because in that case you will need to reclean and rezip them again anyway. You can go through the rest of your Load Order using Automatic cleaning of ITMs and UDRs on all your mods plugins. The sequence of cleaning mods plugins should be after you have your Load Order correct, masters are cleaned, then clean them with the last to load being the last to clean. Mod authors should have done them already, so most will probably not need cleaning. Also look out for any mod specific cleaning instructions in the mods description. Prime example = The Unofficial Patches will not need any cleaning, they are already done, and any remaining ITMs in those plugins should be left alone because they do have a purpose .. ( its a very rare occasion when this is true ). The xEdit Work In Progress Development topic is at the following link https://www.afkmods.com/index.php?/topic/3750-wipz-tes5edit/ Development project is at GitHub https://github.com/TES5Edit/TES5Edit And newer versions of xEdit (3.2.7 +) have a link to Discord top right of xEdit window.
-
Version 1.0.0
280 downloads
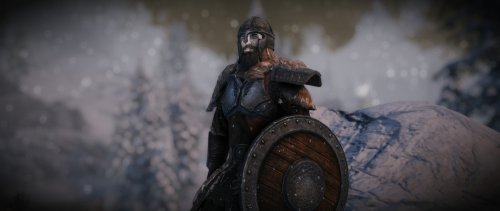
Description: Armor Variants Expansion aim to adjust and increase variety of armors on Skyrim, by add new armors custom models to some vanilla and usual armor category trying to be closest to the lore friendly definition. This is not a repleacer models mod, but it add new variants in the same way as the vanilla Skyrim original sets. All variants are complete of models for both genders and races, enchantments, world locations, level lists so NPCs, crafting and upgrade recipes as the vanilla game. More in details, for the moment add a new variants, complete and integrated, for: -Iron (helmet, cuirass, an heavy tower shield and a wooden one in light category for the hide variant). -Steel (two horned helmets, one simple, two armors with one new Padded variant and a Rounded shield). -Dwemer (helmet and cuirass). -Leather (helmet and cuirass). Plus it add two new almost endgame sets for alternate the unusual use by common high level hostile NPCs, such as bandits, of the Nordic Carved set and the Glass set; in particular: -Improved Steel Plate set (one helmet, one cuirass and gauntlets). This set is equiparable/similar to the Ebony set, so it will be craftable and upgradable with the Ebony Smithing perk. -Improved Scaled set (helmet and cuirass). This set is equiparable/similar to the Glass set, so it will be craftable and upgradable with the Glass Smithing perk. Future plans: Make more variants for other sets. Installation/Uninstallation: Use the Mod Manager. Credits: Niftools community with their NifSkope. Ousnius and Calientefor BodySlide and Outfit Studio. Bethesda for the game.- 2 comments
-
- 1
-

-
- lore-friendly
- armors
- (and 1 more)
-
Does anyone know what affects the dead body cleanup system? I'm getting to a point where if I have a fight with more than a couple of mobs, when I'm finished and go look for corpses to loot, they're all gone! It's incredibly frustrating and also a risk of losing important quest stuff. I found this on reddit. I, too, am convinced that the game is cleaning up bodies in a totally unreasonable way. I was just clearing Dead Man's Respite, an interior area, and when I killed King Olaf all his minions' bodies had despawned. I'm tempted to use the author's fix to bruteforce the game not to clean bodies so obsessively. Would this destabilize the game even more? I may also suspect of another cause. My good old Sofia seems to be the perfect mule, she doesn't seem to have a carry weight limit at all! So I've been carelessly hauling stuff on her back and she's now carrying over 10000 (awkward, I don't know what Skyrim's units of mass are named). I notice that every time I open either her inventory or my own (pretty heavily loaded as well) I lag for a couple of seconds before getting the list. Is it possible that Skyrim SE's choking on too many objects to be aware of? Thanks for any help.
-
I went to upgrade Ruins Edge in my game and for some reason it didn't recognize that my character has the perk to upgrade magical weapons. I am not sure if this was intentional or not by the creator. But I have both the ebony perk and magical perk on Smithing. Any ideas?
-

Coordinates in Skyrim - compatible with CK and xEdit
Jebbalon posted a topic in Mod Support and Discussions
We have been working with a mod that provides XYZ coordinates in Skyrim SE. In CK you can enter the X and Y into the Tamriel Cell View to take you right to your spot. What's My XYZ? also provides the Block and Sub-Block numbers used in xEdit. Very handy tool !! Check it out if you are interested. -

[SOLVED] How to activate newly created mods in Skyrim SE
Altbert posted a topic in Mod Support and Discussions
I wanted to start converting some of my mods for SSE, created a small mod in CK64 for testing (7.5 K), but can't get it activated in SSE. When in System->Mods I see 3 downloaded mods active and mine with a never ending "wait animation"! I've searched the internet, but nothing on this subject. I have had a look in the SSE folders. In the Mods folder I found 3 manifest files, each of these linking to one of the 3 download mods, but none linking to my mod. Save and Push to PC doesn't provide a solution. Anyone have a suggestion or solution? Thanks. Edit: It took my quite a couple of hours, but eventually solved the problem by accident. The Steam and Bethesda accounts should be linked as described somewhere on these forums and that probably did the trick. The "wait animation" still goes on for ever and ever, but I think is looking for a description and image. -
In case you're living under a rock: https://bethesda.net/#en/events/game/mods-and-4k-coming-to-ps4-for-skyrim-and-fallout4/2016/10/04/221 PS4 mods are back. Before you get your hopes up though, one important statement in there needs to be highlighted: What does this mean? It means PS4 mods that are not fully functional with just a single ESP file are out. "External assets" for Skyrim and Fallout 4 are stored in a separate archive file. This means no custom meshes, textures, music, audio, voiced dialogue, or scripts. It's the scripts that are going to place the biggest restriction on what can be done. What it means in practice is basically that something like USLEEP/UFO4P cannot be offered for PS4 users because they both rely on external assets to be functional. Not much point in a patch if it can't even be allowed to edit and compile updated/new scripts. That said, ESP-only mods are better than nothing at all and perhaps down the road Bethesda will be able to convince Sony to loose their sphincters a bit more.


Support us on Patreon!