
Search the Community
Showing results for tags 'editing'.
Found 2 results
-
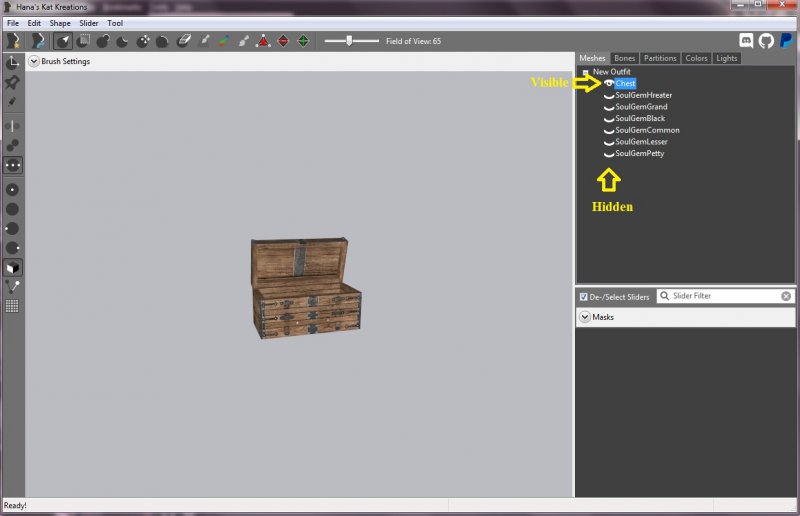
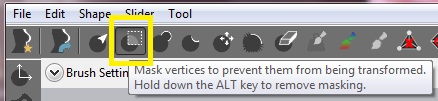
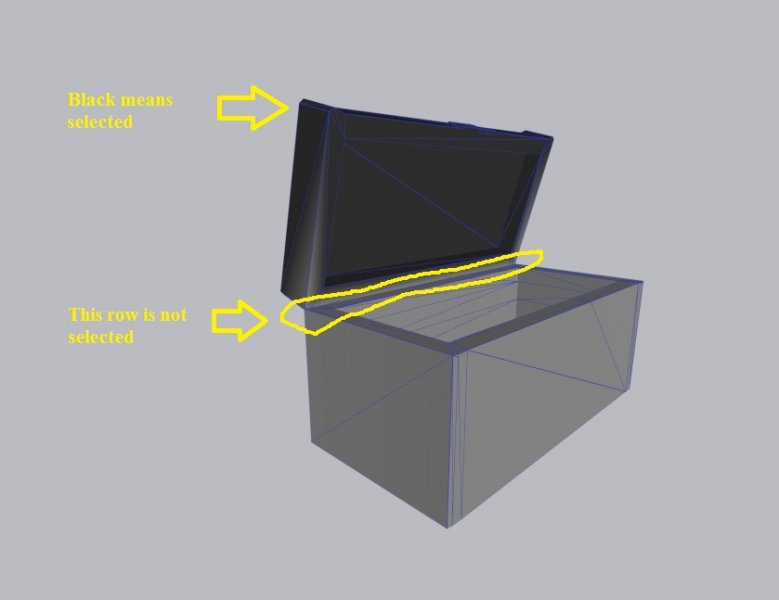
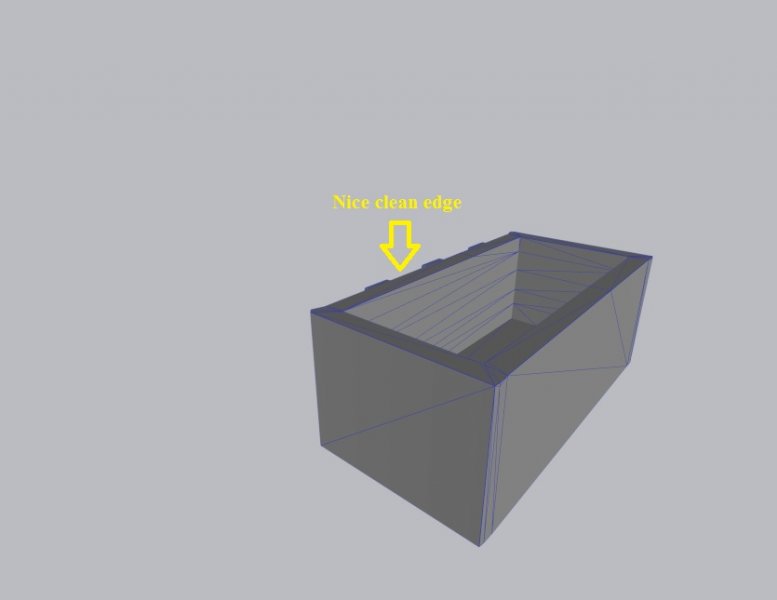
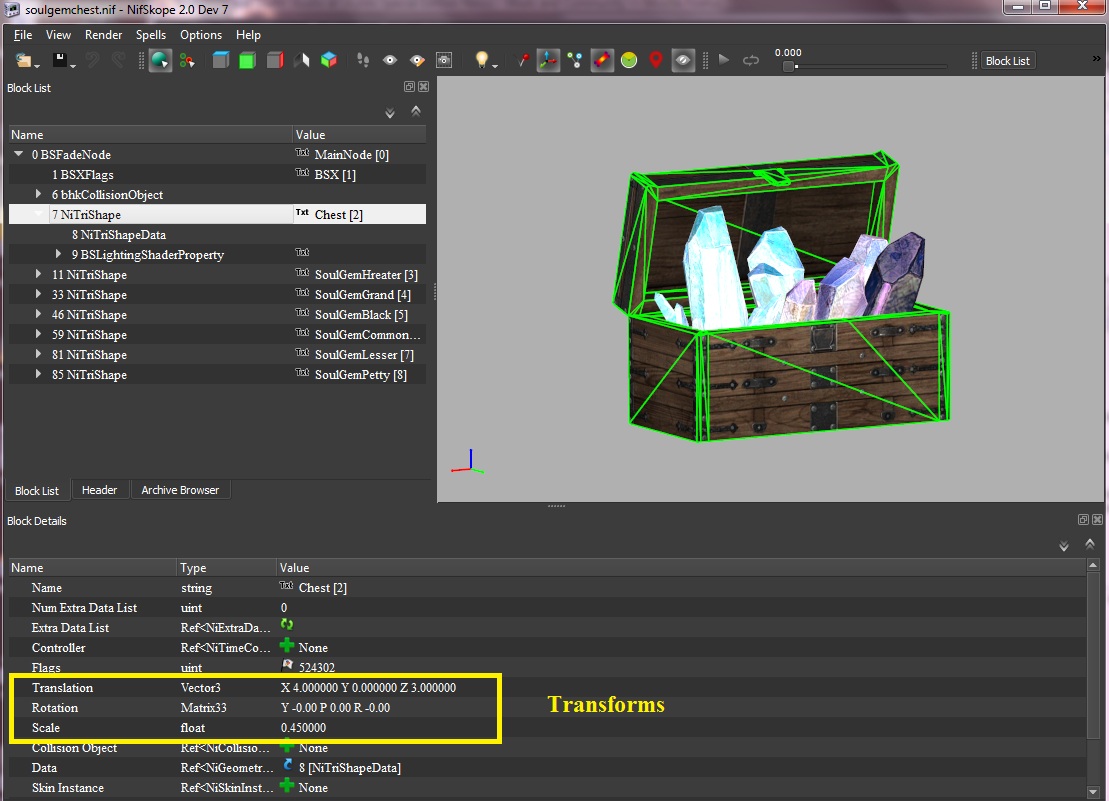
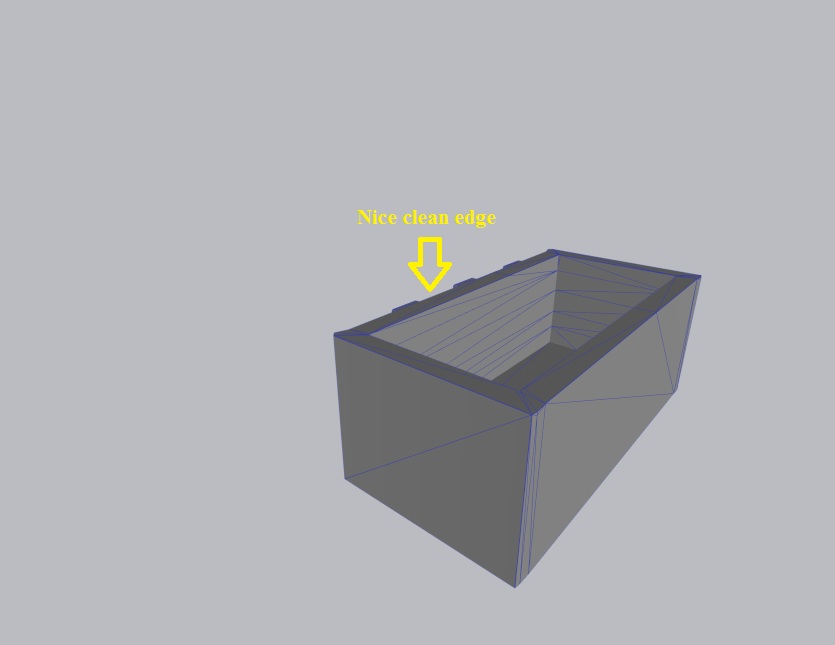
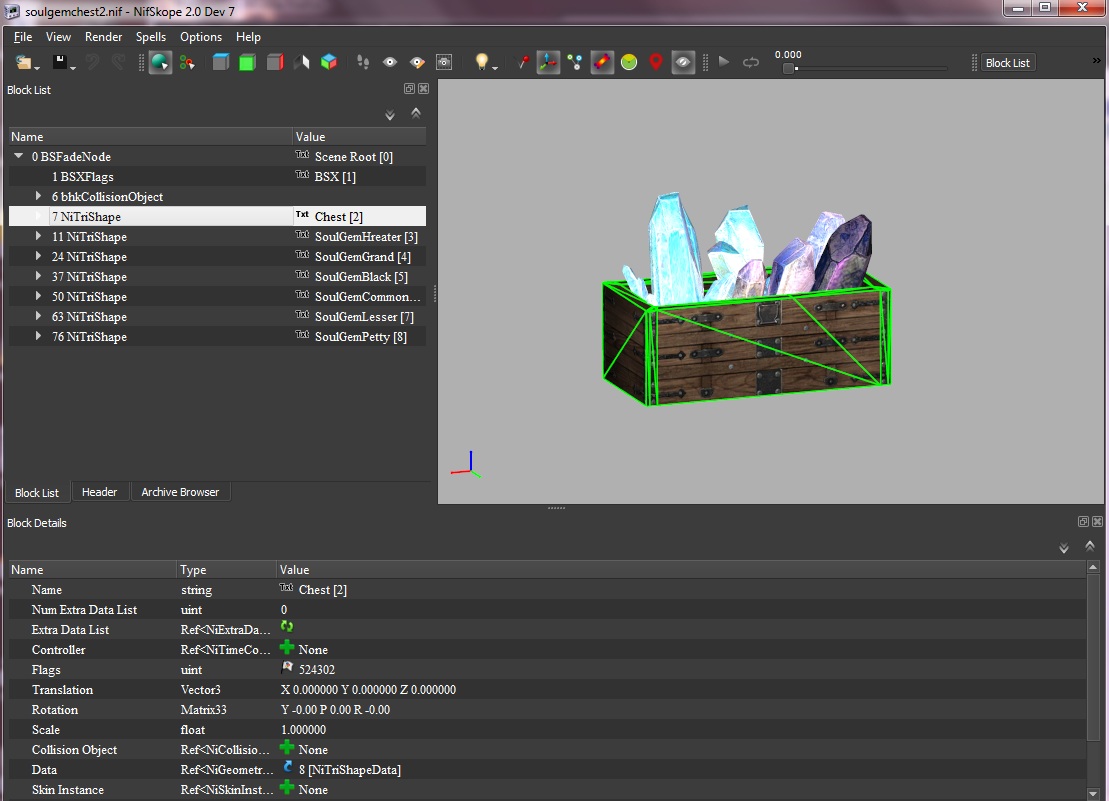
Download location: LE version SE version While it's primary purpose (and reputation) revolves around Female Body mods for use with Bodyslide, the Outfit Studio tool is in itself a powerful all-purpose model editor with robust features. This tutorial assumes prior knowledge of Outfit Studio and it's many functions. See the official Bodyslide/Outfit Studio Wiki for more details. Here I'll use an example of wanting to remove certain sections of a static mesh that are part of a NiTriShape/BSTriShape. Outfit Studio can remove or just move verts much like Blender or 3DS Max but in a smaller, easier to use tool. Note: Outfit Studio cannot edit collision, so if you're following this tutorial you may need to redo your collision to fit your new modified mesh. Of course, if you wanted to remove a complete NiTriShape/BSTriShape that can be done in NifSkope. Step 1; Open the nif in NifSkope 1a) Make sure there are no Transforms (Translation, Rotation or Scale) so you can start with a clean mesh. 1b) If you see Transforms in any xTriShape, right click > Transform > Apply. In this case, it's a custom mesh that was scaled down. 1c) Once all your xTriShapes are clean save the mesh. Step 2; Launch Outfit Studio 2a) Go to File > Import From Nif and select your mesh to import it. Since I only want to work on the "Chest" portion, I've hidden all the other shapes in the Meshes tab by clicking on the little eye icon next to the names. 2b) Select the MASK tool in the upper toolbar (4th button with a square on it). 2c) Carefully select the vertices you want to delete. (Tip: Hit W key to turn on wireframe and T key to turn off textures to see better. You can also change the size of the brush radius under Brush Settings by lowering Size and Focus.) You DO NOT want to select the vertices directly connected to the point you want to stop, always end your selection at the vertices just before that point. 2d) Go to Tool > Invert Mask. (Or shortcut CTRL+I) 2e) Go to Shape > Delete Vertices. This function deletes all UNMASKED vertices, so it's important to invert the mask. (Tip: if you made a mistake and too many verts were deleted, use CTRL + Z to undo the step and start again at 2c. Often I delete small groups of verts at a time to avoid going too far. Yes, you can do steps 2c, 2d and 2e as often as you'd like.) 2f) Go to File > Export to Nif and save your new modified mesh. Our new mesh;


-
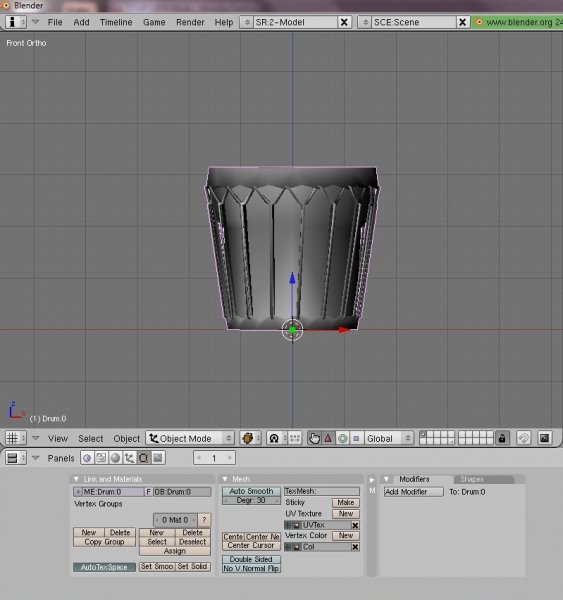
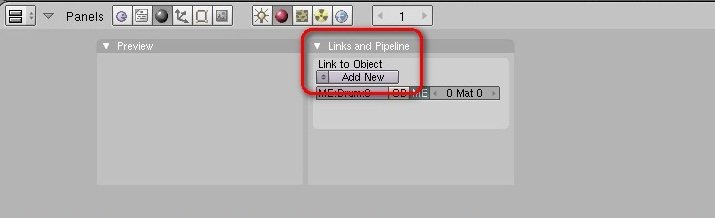
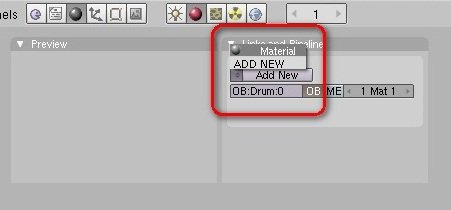
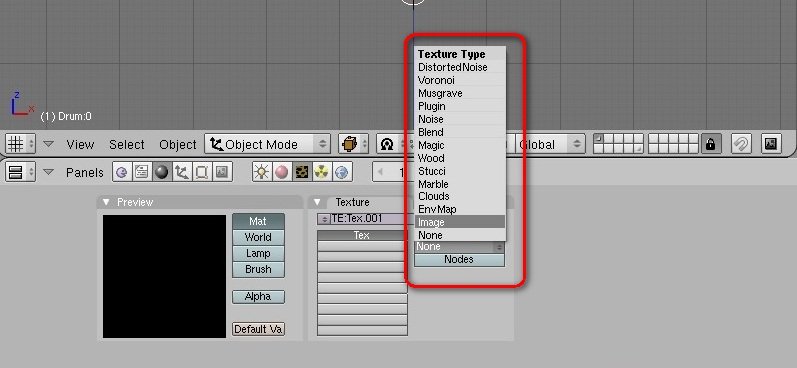
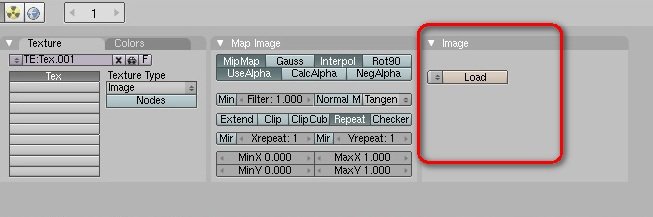
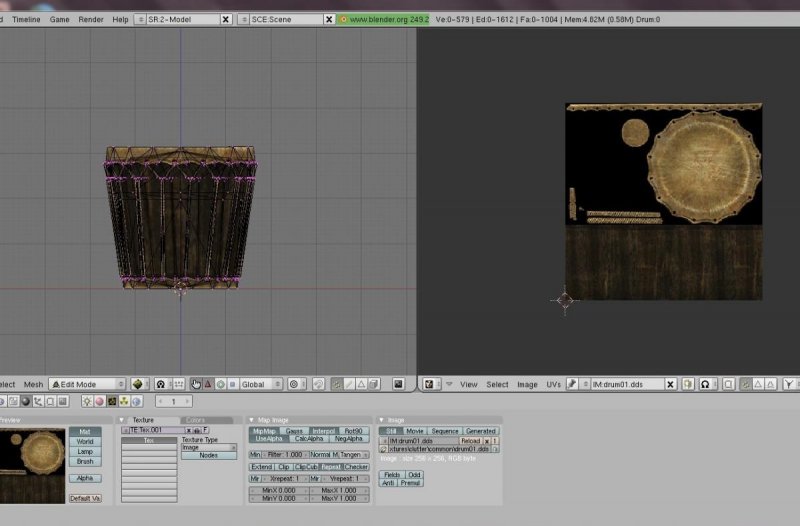
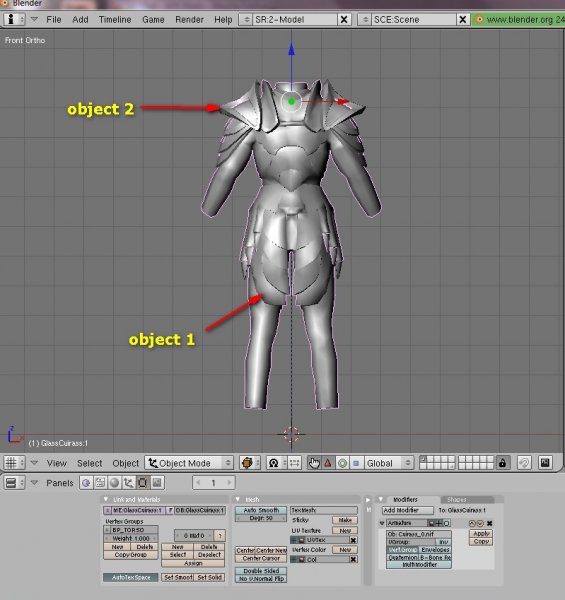
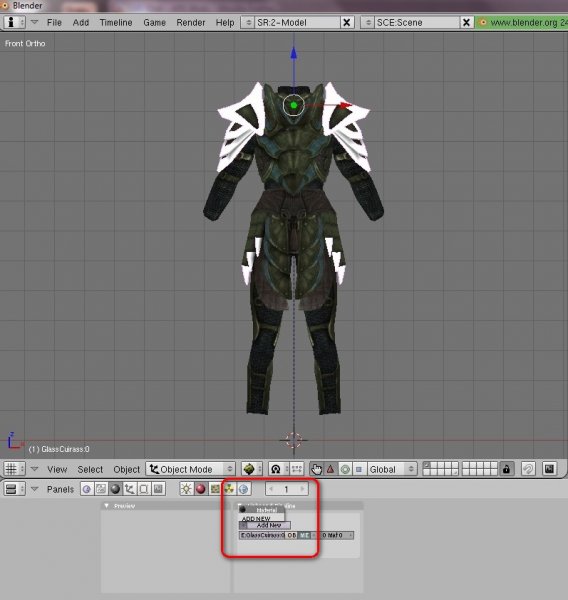
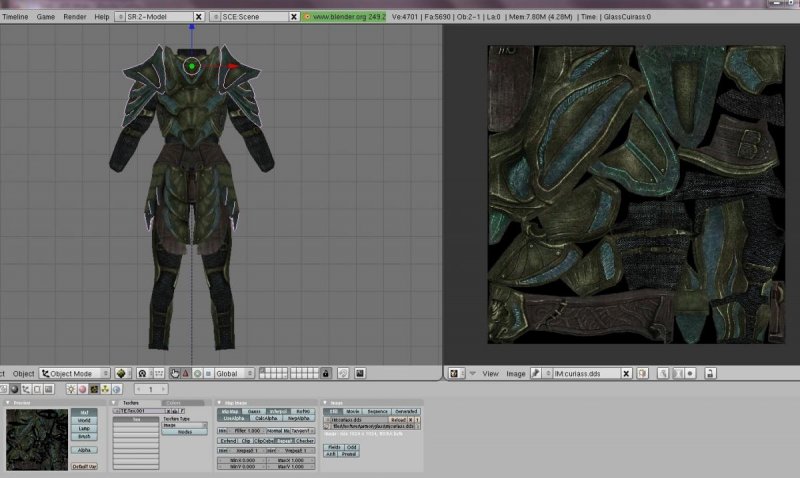
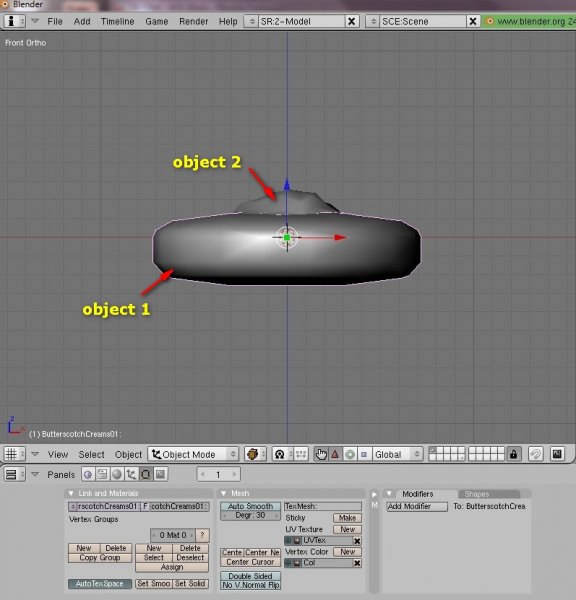
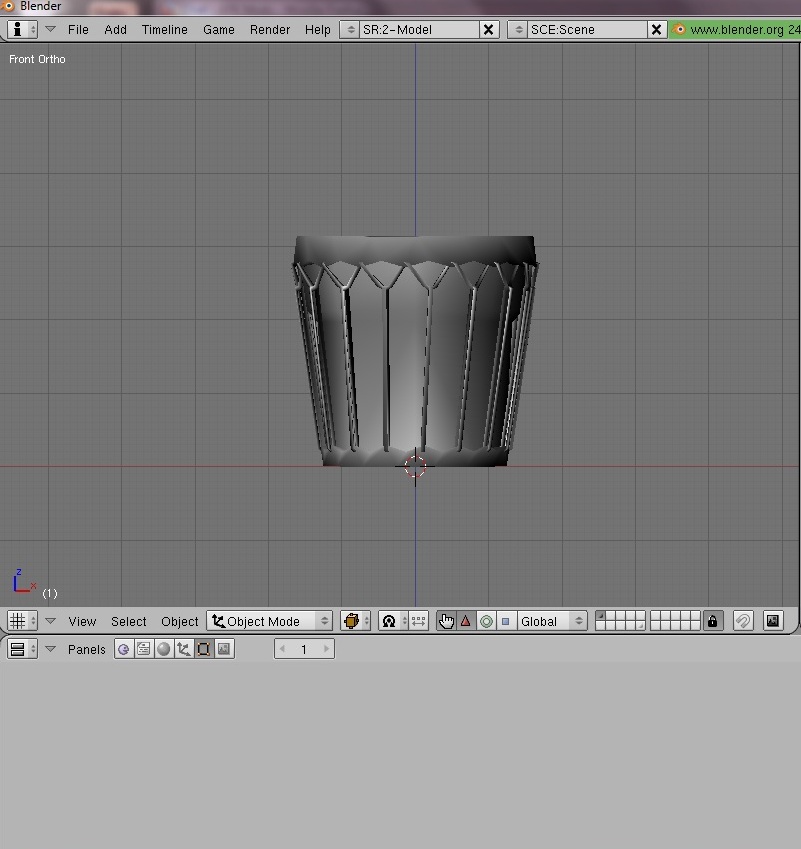
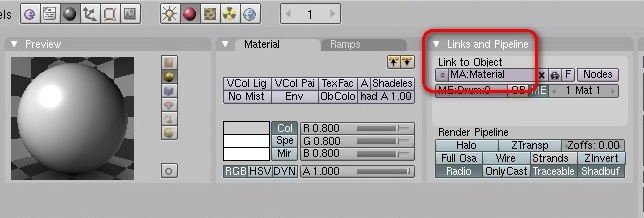
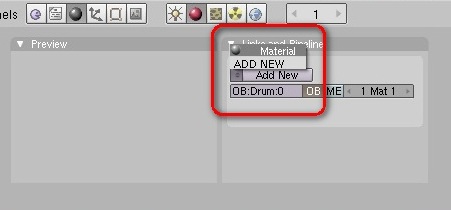
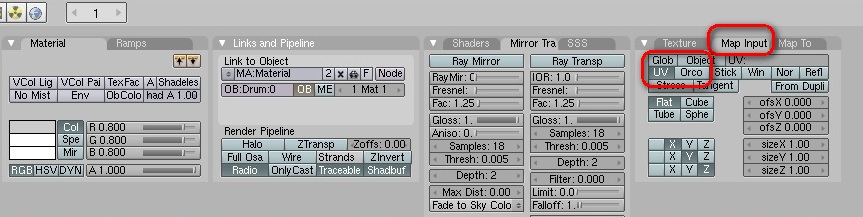
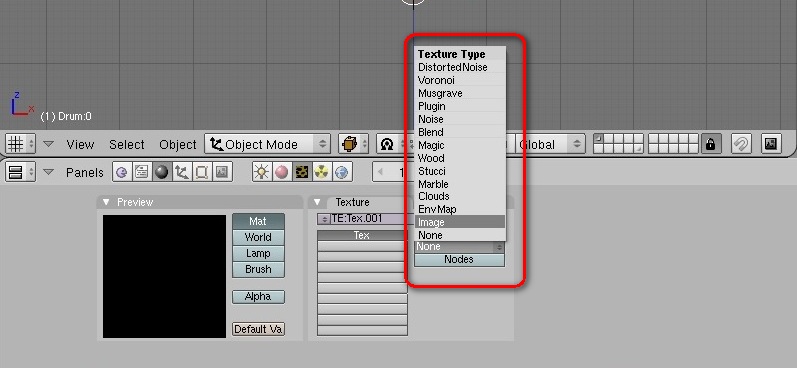
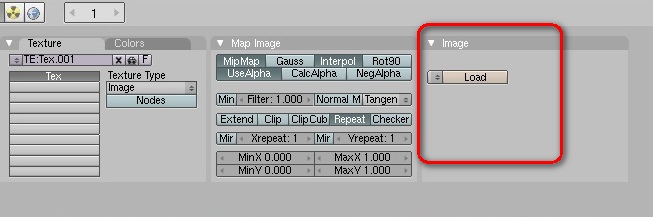
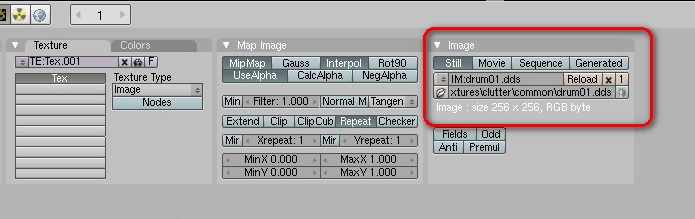
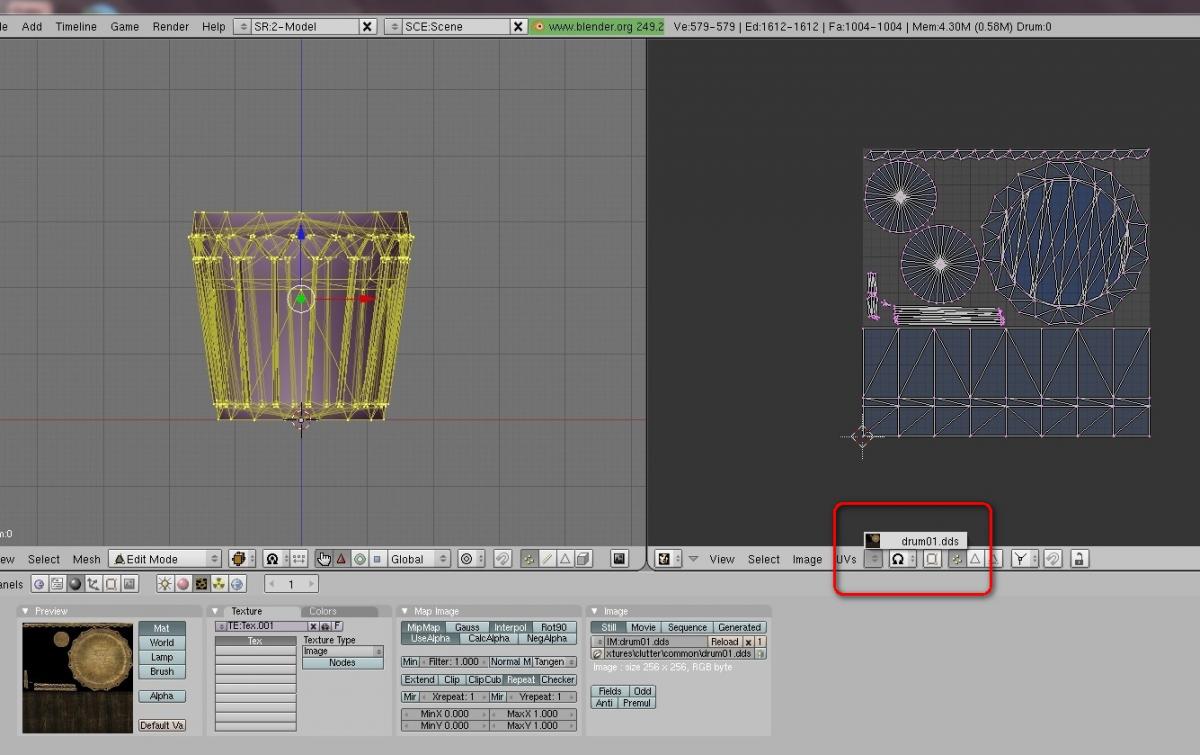
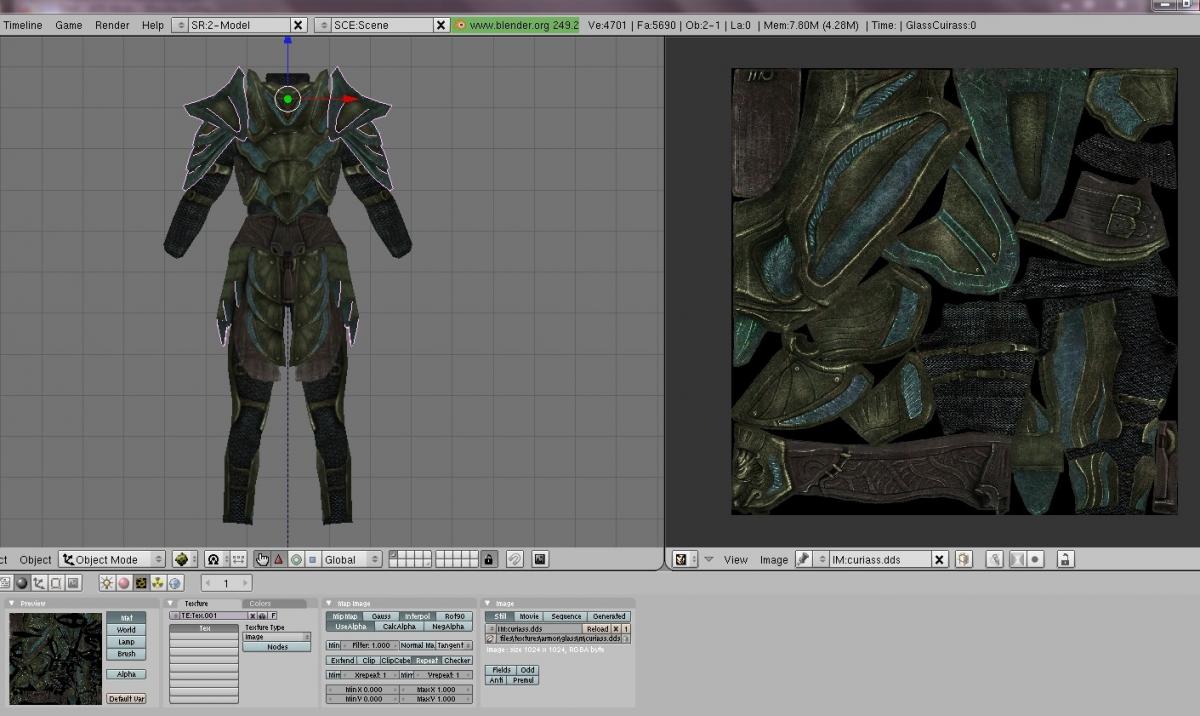
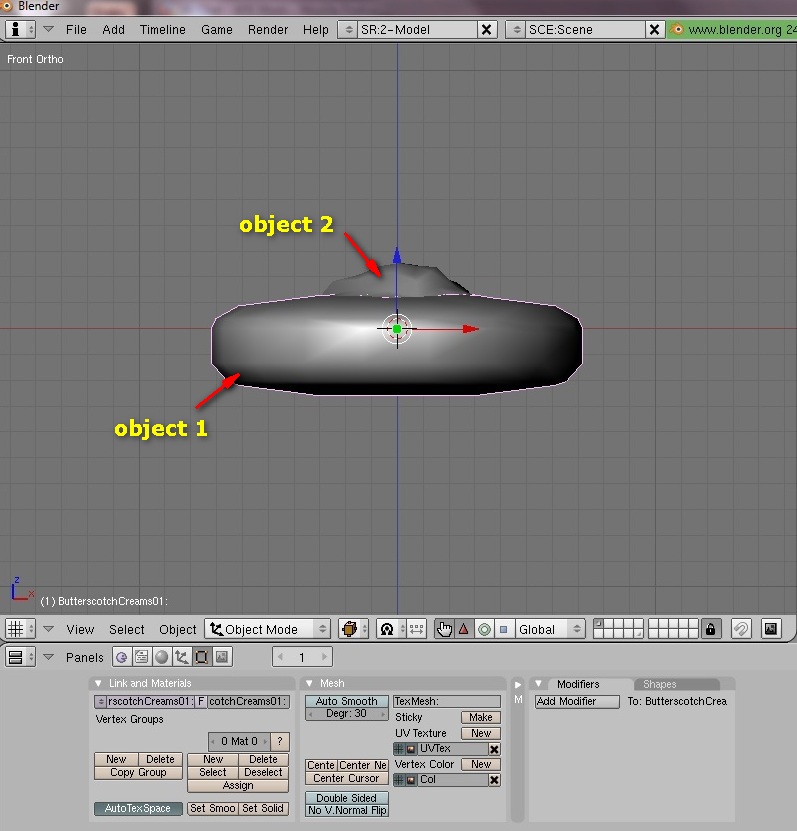
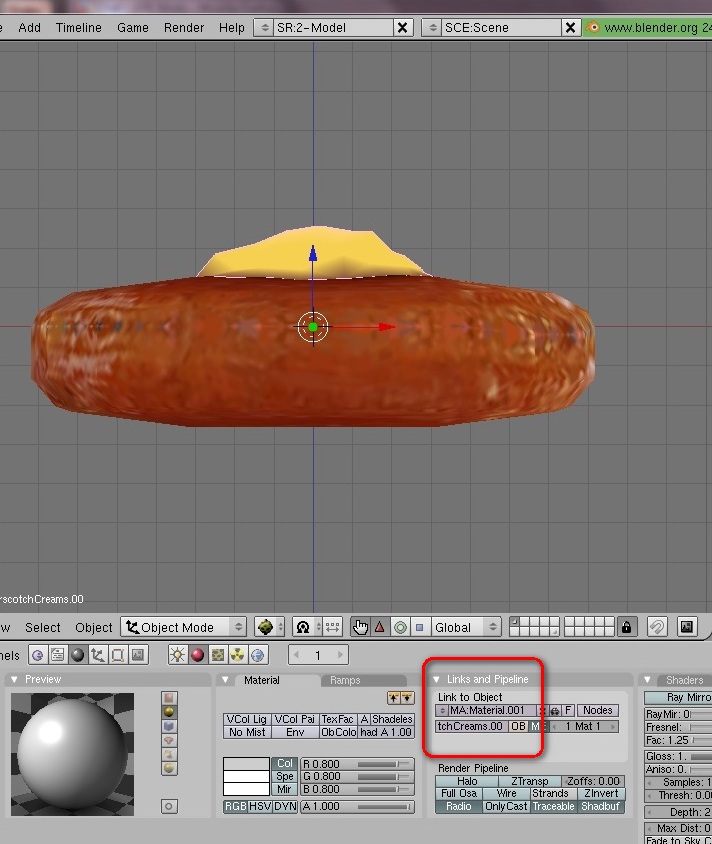
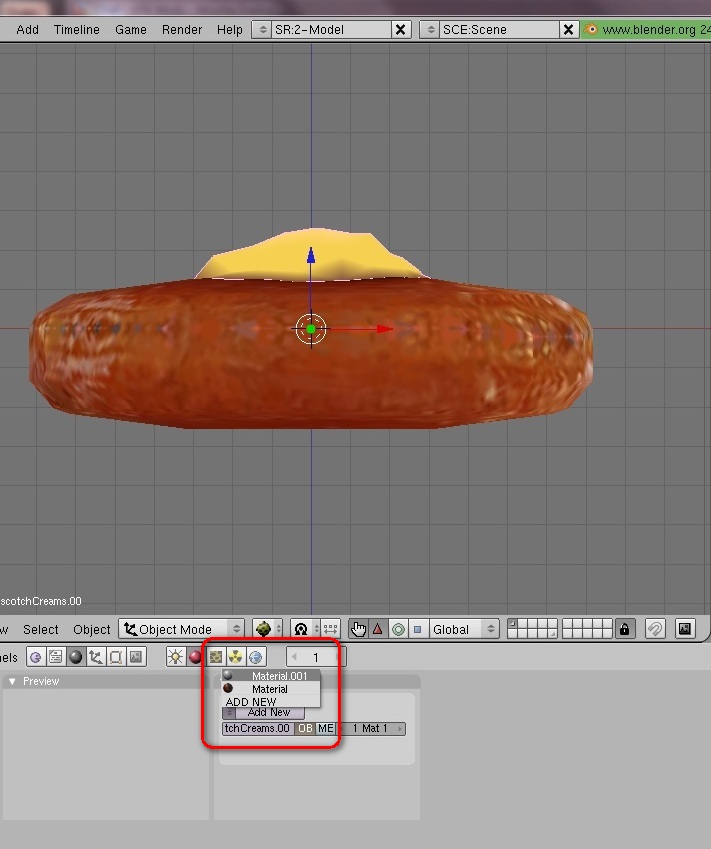
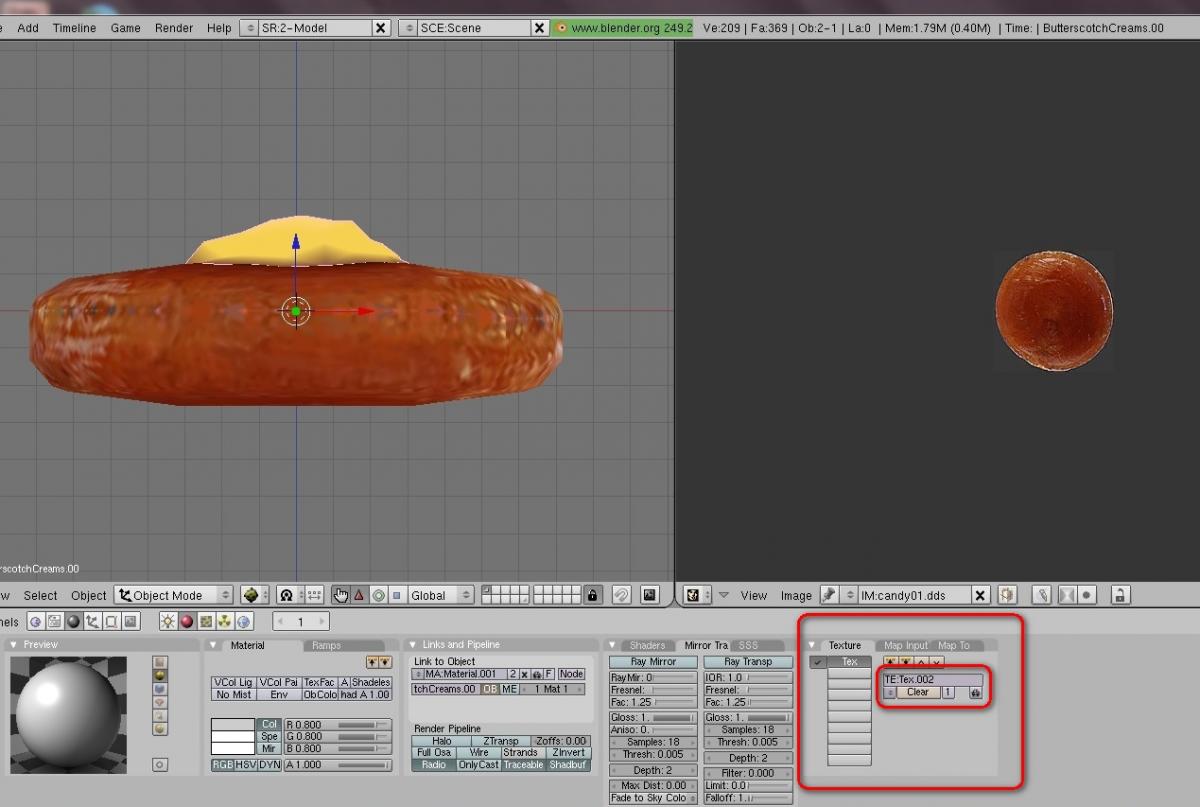
Blender Basics; Add Materials and Textures to nifs ========================================================== Pertains to: Blender 2.49b This tutorial will explain the process of adding a material and texture to an existing .nif mesh that has been imported into Blender for the purpose of editing. This is just one step in the modding process, but a very important one. If these steps are not performed, the mesh will not have a UV map on export, will not contain normals, and will not be able to have textures assigned to it. There are 3 examples in this tutorial that should cover all scenarios; Example #1 is a mesh with a single NiTriShape and a single texture file. Example #2 is a mesh with multiple NiTriShapes, but still a single texture file. Example #3 is a mesh with multiple NiTriShapes and multiple texture files. Most of the steps are the same, the differences will be pointed out. --------------------------------------------------------------------------------------------- Example mesh #1: Drum01.nif -- One NiTriShape, one texture. 1. Prepare mesh for import. See this tutorial. 2. Import mesh into Blender. You should be looking at a grey mass, outlined in pink (means it's highlighted). Press A to deselect everything. 3. In Object mode, right-click select the drum object. This will bring up the normal Editing panel. 4. Press F5 to bring up the Material panel. In the Links and Pipeline tab, you'll see a box with ME: followed by the name of the object (You can change the object name here to something meaningful if you want). Just above that, click on the box that says Add New. 5. Some new tabs will show up and where it said Add New will now be filled in with MA: Material. We've now assigned the material. 6. Beside ME is a box named OB. Click on that. The panel will switch back to the single tab again. (If you changed the name in ME, change the OB name now to be the exact same.) Do not click on Add New, instead, click on the arrows beside it. You'll see a list of any materials you've already assigned to things. Select the same material (so Material) as you assigned in ME. What we've done is assigned the same material to the two related pieces of the same object - the ME or mesh, and the OB or object. These should always be the same or things will get confused. 7. The multi-tabs will now re-appear. Move over to the right and the Texture tab. Click on Add New. It should now say TE: Tex.001 (for the first texture we're assigning). 8. In that same tab, switch to Map Input. You'll see the word Orco is pressed by default. Click on UV instead. THIS IS IMPORTANT. 9. Press F6 to switch to the Textures panels. There's a box named Texture Type that should say None in it. Using the arrows, change that to Image. 10. On the far right is a new Image tab. Click on Load and you can browse to whatever texture image you want to use (It's best to keep a copy of the .nif open in NifSkope so you can look up the texture file name here or keep a generic texture file handy to use. Once it's exported this information is lost anyway). We've now assigned the texture to the object. 11. Switch to Edit mode, make sure everything in your object is selected. Then switch your screen to UV/Image Editor (this is where using a split screen comes in handy and you can change one side). In the editor, click on the arrows to find the texture file we just added so that it shows up in the render window. You should now be seeing the UV map of your (existing) object in the window over the texture file. (if it's not an existing object that hasn't been UV mapped yet, that's a different story) 12. Switch the Draw Type to Textured and you should see your object with the proper texture assigned on it. If not, go through the steps again to see where it went wrong. And that's it. The important thing to remember is that each object has two related sub-names - ME (mesh) and OB (object) that need the same material assigned, plus one texture assigned. Once that is done, that material is linked to that texture. This needs to be done for anything you model in Blender, so try to make it a habit to do this as soon as you import a model then continue on to editing. ------------------------------------------------------------------------------------------------- Example mesh #2: Armor\Glass\M\Cuirass_0.nif -- Multiple NiTriShapes, one texture. This is a rare example. The only reason for this is if you want different shader options on sections of your mesh. Otherwise your mesh should be optimized as Example #1. 1. Follow steps 1 and 2 above. 2. At Step 3 - In Object mode, right-click select one of the objects of the mesh. This will bring up the normal Editing panel. 3. Follow through all the rest of the steps above. This takes care of the first object in the mesh. 4. Deselect the first object and right-click select the second object. This will bring up the normal Editing panel. 5. Press F5 to bring up the Materials panel. Do not click on Add New, instead, click on the arrows beside it. You'll see a list of any materials you've already assigned to things. Select the same material (so Material) as you assigned to the first object. We need it to be the same. 6. Click the OB button and do the same. Assign it to the same existing material. 7. You should notice the texture shows up without having to go through the steps of assigning a texture. This is because we've already linked Material to Tex:001, so you only need to assign the material to your object. --------------------------------------------------------------------------------------------- Example mesh #3: Butterscotchcreams01.nif -- Multiple NiTriShapes, multiple textures. 1. Follow steps 1 and 2 above. 2. At Step 3 - In Object mode, right-click select one of the objects of the mesh. This will bring up the normal Editing panel. 3. Follow through all the rest of the steps above. This takes care of the first object in the mesh. 4. Deselect the first object and right-click select the second object. This will bring up the normal Editing panel. (This object may look textured already but it's not, that's just the vertex colouring.) 5. Press F5 to bring up the Materials panel. This time you want to click on Add New. We need to distinguish this object as different than the first object. Our new material is now called Material.001. 6. Click the OB button. Using the arrows, assign it to the same Material.001 we just created. 7. The multi-tabs will now re-appear. Move over to the right and the Texture tab. Click on Add New. It should now say TE: Tex.002 (for the second texture we're assigning). 8. Follow through steps 8-12 above to finish this object. Repeat if there are more objects. -------------------------------------------------------------------------------------------------- What you should take away from this; * One NiTriShape = one object in Blender * One object has two sub-names - ME (mesh) and OB (object) * One object requires one material assigned, to both sub-names * One material = one texture * Re-using a material will automatically re-use the linked texture * Materials and textures can be used on multiple objects Also of note, you can rename a Material by clicking in the material name box if you'd like it to have better meaning, however, once exported out of Blender, it has no meaning as those blocks are deleted. ****


Support us on Patreon!